
Pine floor sanding is a crucial step in maintaining their beauty and longevity. Over time, even well-kept pine floors can develop scratches, dents, and wear marks that dull their natural charm. Sanding removes these imperfections and prepares the wood for a fresh finish, bringing your floors back to life. Whether you’re a DIY enthusiast or tackling this task for the first time, learning how to properly sand pine floors will ensure stunning results.
In this guide, we’ll walk you through the step-by-step process of sanding pine floors, from gathering the right tools to applying the perfect finish. Pine is a softer wood than most hardwoods, making sand both unique and challenging. With careful preparation, techniques, and attention to detail, you can restore your pine floors to their original beauty, transforming your space with a smooth, polished surface.

Table of Contents
Section 1: Understanding Pine Floors
Characteristics of Pine Wood
Pine is a softwood that is widely favoured for its affordability, natural charm, and versatility in home design. Its softness gives it a warm and inviting feel, but it also makes it more prone to wear and tear than harder wood options like oak or maple. A key aspect of pine wood’s appeal lies in its aesthetic qualities. Pine floors often feature beautiful natural knots, distinct grain patterns, and various colour variations, from light yellow to rich amber tones. These unique characteristics give pine floors a rustic and traditional appearance, which is why they are popular in many homes.
Softness and Vulnerability to Wear
While pine floors are beautiful, their softness makes them more susceptible to damage. Over time, daily foot traffic, furniture movement, and general use can cause scratches, dents, and scuffs to appear on the surface. These imperfections may detract from the floor’s overall look, requiring regular maintenance and eventual sanding to restore their appearance.
Why Sanding Is Essential for Pine Floors
Sanding plays a crucial role in maintaining the beauty of pine floors. It removes visible damage like scratches and dents and smooths the surface, preparing it for sealing or refinishing. Finances may not adhere properly without sanding, leading to an uneven or poorly protected surface. Regular sanding helps ensure the wood remains in excellent condition, enhancing its natural beauty and extending the floor’s life.
Challenges Specific to Sanding Pine Floors
Due to pine’s softness, sanding pine floors can be more challenging than working with harder wood. The risk of oversanding or accidentally gouging the wood is higher, making it essential to use the right techniques and equipment. Careful handling of the sander, proper grit selection, and understanding how to avoid excessive pressure on the wood is key to preventing damage and achieving a smooth, even finish. With the right approach, however, sanding can restore the floor’s original charm without compromising the integrity of the wood.

Section 2: Tools and Materials Required
Essential Tools for Sanding Pine Floors
Sanding pine floors requires the right tools to ensure a smooth and even finish without damaging the wood. Choosing the correct equipment is crucial, as pine is a softwood and more prone to over-sanding. Below are the key tools needed for the job:
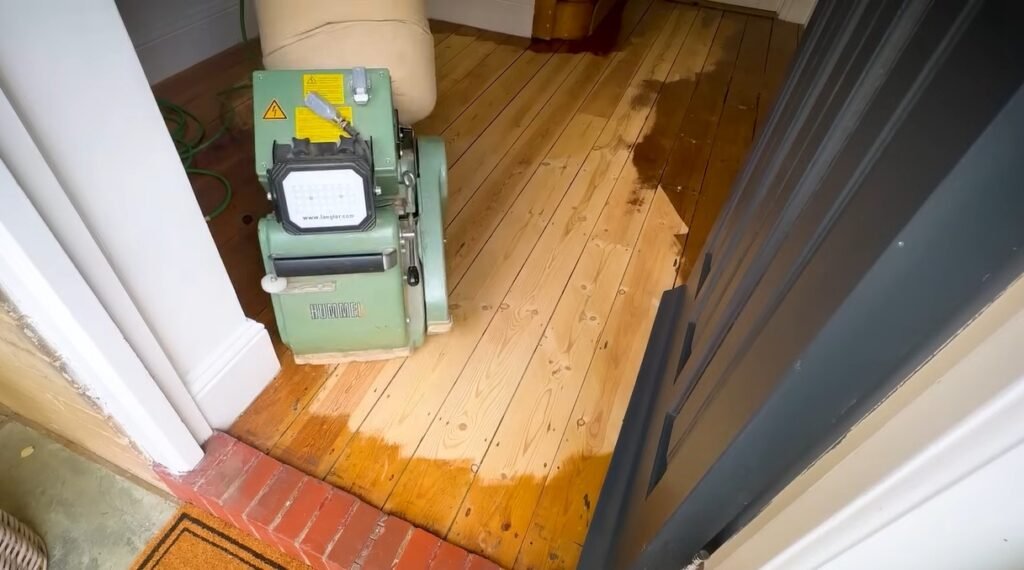
- Drum Sander: A drum sander is the go-to tool for sanding large areas of flooring. It works quickly and aggressively, making it ideal for removing old finishes, deep scratches, and uneven surfaces. However, due to its power, it can be challenging for beginners to control, especially on softer wood like pine, where too much pressure can leave deep grooves.
- Orbital Sander: For those new to floor sanding, an orbital sander may be a better option. It’s less aggressive than a drum sander and easier to control, making it a safer choice for softer woods like pine. Though it takes longer to sand a floor with an orbital sander, it reduces the risk of gouging or over-sanding.
- Edge Sander: A drum or orbital sander cannot reach the edges and corners of the room, so an edge sander is essential. This tool is designed to sand the perimeter of the room and tricky spots around baseboards. In smaller corners, you may need to switch to hand-sanding with sandpaper to ensure a uniform finish.
- Sandpaper Grit: Sandpaper comes in various grit levels, and selecting the right grit is crucial to a successful sanding job. For pine floors, it’s essential to start with a coarse grit (36-40) to remove the old finish and scratches. Medium grit (60-80) follows to smooth the surface further, and fine grit (100-120) is used for the final pass, ensuring the wood is smooth and ready for staining or sealing.

Additional Equipment for the Sanding Process
Aside from the main sanding tools, there are several other items you’ll need to make the sanding process efficient and safe:
- Vacuum Cleaner or Dust Extractor: Sanding produces a significant amount of dust, which can settle into the wood grain or become airborne, leading to a messy environment. A vacuum cleaner or dust extractor is necessary to clean the dust between sanding passes and at the end of the job to ensure a pristine surface for finishing. Look for a vacuum with a HEPA filter to capture fine dust particles effectively.
- Floor Buffer: After the final sanding, a floor buffer can be used to smooth out any remaining imperfections and give the floor a polished, professional look. This tool also helps to distribute the finish more evenly when applied.
- Safety Gear: Sanding floors generate dust and noise, so safety gear is essential. Be sure to wear:
- Dust Mask or Respirator: Protects you from inhaling fine dust particles that can be harmful to your respiratory system.
- Safety Goggles: Prevents dust and debris from getting into your eyes.
- Ear Protection: Sanding machines can be loud, and prolonged exposure to high noise levels can damage your hearing. Earplugs or earmuffs are recommended.
- Knee Pads: Sanding often involves working on your knees, especially when dealing with edges and corners. Knee pads can help reduce discomfort and protect your joints during the process.

Materials for Finishing After Sanding
Once the sanding process is complete, it’s important to have the right materials ready to finish the floor. The type of finish you choose will affect the appearance and durability of your pine floors.
- Wood Stain (Optional): Staining is an optional step that can enhance the natural beauty of pine by adding color and depth. If you prefer a darker or more customized look, select a stain suitable for pine wood. Always test the stain in a small, inconspicuous area to ensure the desired result.
- Sealant or Finish: After sanding, applying a protective finish is crucial for preserving the newly sanded pine floor. Common finishes include:
- Oil-based Polyurethane provides a durable and long-lasting finish that deepens the wood’s color and offers excellent protection against wear and moisture. However, it takes longer to dry and has a stronger color than water-based options.
- Water-based Polyurethane: Dries faster, has a lower color, and gives the wood a more natural look. It’s ideal to have a clear finish that doesn’t yellow over time.
- Hard Wax Oil: A natural alternative that offers a satin sheen and a more eco-friendly option. It provides moderate protection and is easy to reapply when necessary.
- Wood Filler: If your pine floor has cracks, gaps, or holes, wood filler should be applied before the final sanding passes. This will help create a smooth, even surface before applying the stain or finish. Be sure to choose a filler that matches the color of your pine floor.

Section 3: Preparing the Room for Sanding
Proper preparation ensures a smooth and efficient sanding process for your pine floors. Skipping or rushing through this step can lead to later issues, such as dust spreading throughout the house, damage to the floor, or safety hazards. Taking the time to prepare the room thoroughly will make the sanding process more manageable and will help you achieve a professional-quality result.
Step 1: Clear the Room
Before you start sanding, it’s essential to completely empty the room. Remove all furniture, rugs, and décor to create a clear working space. Sanding creates a large amount of dust, and even the smallest items left in the room can collect dust or get in the way of your equipment. Move all pieces to a different room, and if your furniture is heavy, consider using furniture sliders to prevent scratching the floor when moving them out.
If you have heavy, immovable furniture, you might be tempted to work around it, but this can cause uneven sanding results and will make the project look unfinished. It’s best to work in a completely empty space.
Step 2: Inspect the Floor
Once the room is clear, take a few minutes to thoroughly inspect the floor. Look for any protruding nails, screws, or staples. These can damage your sander or cause uneven sanding if they catch on the machine. Use a hammer or a nail set to sink any exposed nails just below the surface of the wood. If there are screws, make sure they are countersunk and flush with the wood surface.
Next, check for any loose or squeaky floorboards. If you find any, secure them by nailing or screwing them down before you start sanding. Pay attention to gaps between the boards. If they are too wide, you may need to fill them with wood filler, particularly in older homes where floorboards may have shifted over time.
Step 3: Protect Adjacent Areas
Sanding creates an immense amount of dust, which can easily spread to other parts of your house if not properly contained. To avoid dust settling in adjacent rooms, seal off the work area with plastic sheeting. Tape plastic sheets over doorways, vents, and any other openings to keep dust confined to the room you’re working in.
It’s also a good idea to protect walls and skirting boards from dust and accidental bumps during the sanding process. You can use painter’s tape to cover the edges of your skirting boards. This will help keep them clean and free from sanding dust, as well as prevent damage from the sander if you get too close to the edges.
Step 4: Safety Precautions
Sanding floors is not only a dusty job but also a noisy one. To protect yourself during the sanding process, it’s essential to use proper safety gear:
- Dust Mask or Respirator: Sanding creates fine wood dust, which can be harmful when inhaled. A standard dust mask might suffice for smaller jobs, but for larger sanding projects, a respirator with a HEPA filter is recommended to protect your lungs from harmful particles.
- Safety Goggles: These goggles protect your eyes from flying dust and debris. Even if you use a sander with a dust collection system, fine particles will still be in the air and can cause irritation if they get into your eyes.
- Ear Protection: Sanding machines are loud, and prolonged exposure to their noise can damage your hearing. Always wear ear protection, such as earmuffs or earplugs, to safeguard your hearing during the sanding process.
- Knee Pads: You’ll likely spend much time on your knees, especially when working with an edge sander or sanding small corners by hand. Wearing knee pads will provide cushioning and prevent discomfort during the process.
Step 5: Ventilation
Although it’s important to keep the dust contained in the work area, you’ll still need to ensure adequate ventilation, especially if you plan on staining or applying finish to the floor after sanding. Some finishes can release strong fumes that are hazardous if inhaled in an enclosed space. Open windows and doors where possible, and use fans to circulate fresh air during the process.
Step 6: Test for Lead Paint or Old Finishes (if applicable)
If you live in an older home, especially one built before 1978, it’s a good idea to test for lead paint or old finishes that may contain harmful chemicals before starting the sanding process. Sanding lead paint or hazardous materials can release toxic dust into the air, which poses a serious health risk. You can use a home testing kit to check for the presence of lead. If the test is positive, consult a professional before proceeding, as sanding lead-painted floors requires special precautions and equipment.
Step 7: Plan Your Sanding Path
Before you start sanding, it’s a good idea to plan your approach. Identify the direction of the wood grain on your pine floor, and make sure you sand in that direction to avoid damaging the wood fibers. Sanding across the grain can leave unsightly scratches that will be visible even after staining or finishing.
In addition, plan how you will move around the room with your sander to avoid missing any spots or having to walk across freshly sanded sections. A systematic approach, such as starting in a far corner and working your way toward the door, will help you cover the floor evenly and efficiently.

Section 4: Step-by-Step Guide to Pine Floor Sanding
Sanding pine floors is a multi-step process that requires careful attention to detail to ensure the best results. Given that pine is a softwood, it’s essential to use the correct techniques and sanding equipment to avoid over-sanding or damaging the floor. This section will walk you through each step, from the initial rough sanding to the final clean-up, ensuring your pine floor looks smooth, polished, and ready for finishing.
Step 1: Start with Coarse Sanding
The first step in sanding your pine floors is to use coarse-grit sandpaper. This is where you’ll remove old finishes, deep scratches, and uneven patches on the surface. Typically, 36-40 grit sandpaper is used for this phase.
- Using a Drum Sander: If you’re using a drum sander, start in one corner of the room and work your way along the length of the floorboards, always sanding in the direction of the wood grain. Make sure to keep the sander moving steadily at all times. Holding it in one place too long can create dips or gouges in the soft pine wood. Remember to keep your movements even and controlled, applying only light pressure to avoid damage.
- Using an Orbital Sander: If you’re new to sanding, an orbital sander is often a safer choice for pine floors, as it’s easier to control. While it’s less aggressive than a drum sander, it still requires patience to achieve an even result. Work methodically across the floor, overlapping your passes to ensure every floor section is sanded evenly.
- Sand with the Grain: Sanding with the grain is essential for preventing scratches and damage to the wood fibers. Going against the grain can leave visible marks that will show up later, even after staining and finishing.
Step 2: Medium Sanding
Once you’ve completed the coarse sanding pass, it’s time to move to medium-grit sandpaper, typically 60-80 grit. The goal here is to smooth out the rough surface left by the coarse sanding, remove any remaining imperfections, and prepare the floor for finer sanding.
- Transitioning to Medium Grit: Attach medium-grit sandpaper to your sander and repeat the process of sanding the floor, again moving with the grain. This step will refine the surface, smoothing out any remaining scratches from the coarse grit and further leveling the floor.
- Check for Problem Areas: During this stage, focus on areas that still show visible damage, such as deep scratches or uneven spots. While you don’t want to sand too much in one area, you can go over these spots an additional time if needed, using medium grit to achieve a smoother surface. Just be careful not to press too hard or stay in one place for too long, as pine is soft and prone to over-sanding.
- Sanding Edges: Use an edge sander or hand-held orbital sander to tackle the edges and corners of the room. These areas often require a bit more precision, as a drum or orbital sander may not reach them. Ensure that the sandpaper grit is consistent with the rest of the floor to avoid uneven finishes.
Step 3: Fine Sanding
The final sanding stage uses fine-grit sandpaper, typically 100-120 grit, to smooth out the floor and get it ready for staining or sealing. This step is crucial for ensuring a professional, even surface.
- Fine Grit for Smooth Finishing: Attach fine-grit sandpaper to your sander and make another pass over the entire floor, once again moving with the grain. This pass will remove the last traces of scratches and prepare the floor for the finishing stages. Fine sanding helps achieve a silky-smooth finish that looks flawless when the floor is stained or sealed.
- Pay Attention to Corners and Edges: Use the edge sander or a sanding block with fine-grit paper for corners and edges. Ensure that these areas are as smooth as the main floor to avoid inconsistencies when applying the finish.
- Inspection: After completing the fine sanding, inspect the floor closely for any missed spots or imperfections. If necessary, lightly hand-sand these areas to achieve a uniform finish. At this stage, the floor should feel smooth to the touch, with no visible scratches or rough patches.

Step 4: Cleaning the Floor
Once the sanding is complete, cleaning the floor thoroughly is essential to ensure a flawless finish. Any dust or debris left on the floor will interfere with the staining or sealing process, leading to an uneven or rough final result.
- Vacuuming the Dust: Use a vacuum cleaner with a soft brush attachment to remove the bulk of the dust and debris from the floor. Pay special attention to corners, edges, and between the floorboards where dust can collect. If your sander has a dust bag, empty it frequently to prevent dust from spreading during the process.
- Tack Cloth or Damp Cloth: After vacuuming, wipe the floor with a tack cloth or a damp (but not wet) cloth to pick up any fine dust particles that the vacuum may have missed. Tack cloths are sticky and designed specifically for this purpose, making them ideal for removing tiny dust particles that could otherwise affect the finish. If you opt for a damp cloth, ensure the floor dries completely before proceeding to the next step.
- Double Check: Inspect the room for any remaining dust, especially in crevices or between floorboards. Even a small amount of dust can ruin the smoothness of the finish, so it’s crucial to be thorough in this step.

Key Tips for Successful Sanding
- Work in Sections: Divide the floor into manageable sections and work through them methodically, ensuring even sanding throughout the room. Overlapping your sanding passes by 50% helps avoid any missed spots.
- Use the Correct Grit Progression: Always start with coarse grit and work your way down to finer grits. Skipping grits (for example, going straight from coarse to fine) can leave scratches that will be difficult to remove later.
- Maintain Consistent Pressure: Whether using a drum sander or orbital sander, maintain steady, even pressure throughout the sanding process. This prevents gouges and uneven sanding, especially with softwoods like pine.
- Keep the Sander Moving: Never let the sander sit still while it’s running. Always keep it moving to avoid creating dips or marks in the wood. Make long, even passes to achieve a uniform finish.
- Edge and Detail Work: Remember the room’s edges and corners. These areas can easily be overlooked, but careful sanding here will make a big difference in the floor’s overall appearance.
Section 5: Finishing the Sanded Pine Floor
Once you’ve completed the sanding process, your pine floor is smooth, clean, and ready for finishing. The finish you choose will protect the wood from wear, moisture, and damage while enhancing its natural beauty. In this section, we’ll explore the different types of finishes, how to apply them, and tips for achieving a flawless result. Finishing your floor properly is the key to long-lasting durability and a professional look.

Step 1: Choosing a Finish
The finish you apply to your pine floor will not only determine how it looks but also how it holds up over time. There are several types of finishes to choose from, each with its own advantages and aesthetic qualities. Your choice of finish should depend on factors such as the level of foot traffic, your desired look, and your maintenance preferences.
- Oil-Based Polyurethane: This is one of the most popular finishes for pine floors due to its durability and rich, amber glow. Oil-based polyurethane deepens the wood’s natural color and enhances its grain, giving it a warm and traditional look. It’s highly durable, making it ideal for high-traffic areas, but it does take longer to dry—usually 24 hours between coats—and has a stronger odor compared to water-based finishes.
- Water-Based Polyurethane: If you prefer a more natural, clear look, water-based polyurethane is a great option. It dries much faster than oil-based finishes, usually within 2-4 hours between coats, and has a low color, making it more convenient to apply. Water-based finishes are also non-yellowing, meaning they maintain the original color of the pine without adding a warm tint. While not as durable as oil-based polyurethane, water-based polyurethane is still a solid choice for most residential settings.
- Hard Wax Oil: For those looking for a natural, eco-friendly option, hard wax oil is a good alternative. It provides a satin finish that enhances the natural feel and texture of the wood without forming a thick, plastic-like coating on the surface. Hard wax oil penetrates the wood and protects it from within, allowing the pine to “breathe.” While it may not be as durable as polyurethane, it’s easier to spot-repair, and reapply, making it a great option for those who prefer a more natural look and feel.
- Wood Stain (Optional): Before applying a protective finish, you can choose to stain your pine floor. Staining allows you to change the color of the wood while still preserving its grain and texture. Pine is a softwood and tends to absorb stains unevenly, so it’s essential to use a wood conditioner before staining to ensure a smooth, consistent finish. Test the stain on a small, inconspicuous area to see how it interacts with the wood. Remember that staining is optional—many people prefer the natural color of pine, which will deepen with an oil-based finish.

Step 2: Staining the Floor (Optional)
If you’ve chosen to stain your pine floor, this step comes before sealing. Staining adds color to the wood and enhances its grain, but it requires a careful application to ensure an even result, especially on softwoods like pine, which can absorb stain unevenly.
- Pre-Treat with a Wood Conditioner: Because pine is a porous, softwood, it absorbs stains at varying rates, which can lead to blotches or uneven color. To prevent this, apply a wood conditioner to the entire surface before staining. This will help even out the stain’s absorption and ensure a more uniform color.
- Apply the Stain: Using a brush, foam applicator, or lint-free cloth, apply the stain evenly across the floor, working in sections. Apply with the grain of the wood to enhance the natural beauty of the pine. Avoid letting the stain pool or sit too long in one area, as this can cause dark spots. After applying the stain, wipe off any excess with a clean cloth to prevent blotching. Let the stain dry completely, following the manufacturer’s recommended drying times—usually 24 hours.
- Test for Evenness: After the stain has dried, check the floor for any uneven patches. If needed, you can lightly sand these areas with fine-grit sandpaper (220 grit) and apply a touch-up coat of stain.

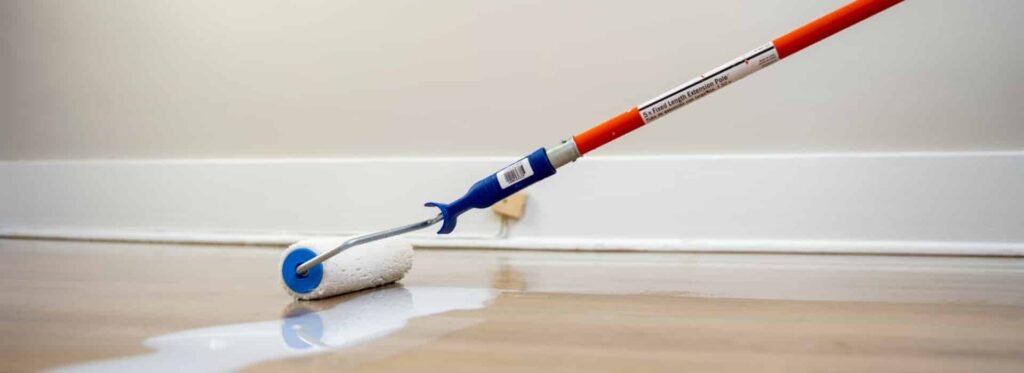
Step 3: Applying the Finish
Now that the floor is sanded and stained (if desired), it’s time to apply the finish. The finish protects the wood from wear, moisture, and damage while giving the floor a polished look. Whether you’re using oil-based polyurethane, water-based polyurethane, or hard wax oil, the application process is similar, though drying times and techniques may vary.
- First Coat: Begin by applying the first coat of your chosen finish using a high-quality brush, roller, or applicator pad. Work in the direction of the grain to prevent streaks and bubbles. Apply the finish evenly, avoiding thick, heavy layers that can lead to an uneven surface or extended drying times. For water-based polyurethane, apply a thin coat and allow it to dry within a few hours. Oil-based polyurethane takes longer to dry, so you’ll need to wait 24 hours before applying the next coat.
- Let It Dry: After applying the first coat, let the finish dry completely. Follow the manufacturer’s recommendations for drying times, as different finishes will have varying drying times based on the product and room conditions (humidity and temperature can affect drying times).

Step 4: Sanding Between Coats
For the best results, it’s important to lightly sand the floor between each coat of finish. This step removes imperfections, dust particles, or bubbles that may have formed in the finish. Use fine-grit sandpaper (220 grit) for this step.
- Light Sanding: Once the first coat has dried completely, use fine-grit sandpaper or a floor buffer with a fine sanding screen to lightly sand the surface. The goal is not to remove the finish but to smooth it out and create a surface that the next coat of finish will adhere to more easily. Be gentle and avoid over-sanding.
- Clean the Floor Again: After sanding, vacuum the floor thoroughly to remove dust, and follow up with a tack cloth to pick up any fine particles. This step ensures that the second finish coat will adhere smoothly without imperfections.
Step 5: Apply Additional Coats
After the floor is smooth and clean, you can apply the second (and third, if necessary) coat of finish. Depending on the type of finish you’re using, you may need to apply multiple coats to achieve the desired level of protection and sheen.
- Second Coat: Apply the second coat in the same manner as the first, working in sections and moving with the wood grain. For water-based polyurethane, you may want to apply 3-4 coats for maximum durability, while oil-based polyurethane usually requires 2-3 coats. Let each coat dry thoroughly before applying the next, and don’t forget to sand lightly between coats.
- Final Coat: The final coat should be applied with the same care as the previous coats but without sanding afterward. Once the last coat is applied, let the floor dry completely before allowing foot traffic on it. Oil-based polyurethane can take up to 48 hours to fully cure, while water-based finishes cure more quickly.
Step 6: Optional Buffing for a Professional Shine
Once the finish has fully cured, you may choose to buff the floor for a high-gloss, professional finish. Buffing helps smooth out the final coat and brings out the wood’s beautiful sheen.
- Use a Floor Buffer: Gently buff the floor with a floor buffer with a fine pad. This step is optional but can give your pine floors a smooth, shiny finish that looks highly polished. Buffing is especially useful if you prefer a glossy look or want to add an extra layer of refinement to the final appearance.
- Final Cleaning: After buffing, vacuum the floor to remove any dust or debris left behind.
Key Tips for Finishing Pine Floors
- Work in Well-Ventilated Areas: Proper ventilation is essential when applying oil-based finishes, as the fumes can be strong. Open windows and doors and use fans to keep the air circulating.
- Stir, Don’t Shake: When using polyurethane, stir the product gently before use to avoid creating bubbles. Shaking the can can introduce bubbles into the finish, which can affect the smoothness of the final coat.
- Take Your Time: Rushing the drying process or skipping steps between coats can result in a less durable finish. Allow the finish to dry thoroughly between coats, and don’t rush to walk on the floor until it’s fully cured.
- Test the Finish: If you’re unsure about the finish’s appearance, test it on a small, hidden area of the floor to ensure you’re happy with the results before applying it to the entire surface.

Section 6: Common Mistakes to Avoid
Sanding and finishing pine floors can be a rewarding DIY project, but it’s also easy to make mistakes along the way, especially for those unfamiliar with working with softwoods like pine. Pine is more delicate than hardwoods, and the softness of the wood means that errors can lead to permanent damage if not addressed carefully. Avoiding common mistakes will help ensure that your floor looks professional and lasts for years. In this section, we’ll highlight some of the most frequent errors people make and provide tips on how to avoid them.
1. Over-sanding and Gouging the Floor
One of the most common mistakes when sanding pine floors is over-sanding or using too much pressure, which can lead to gouges, dips, or uneven spots in the wood. Because pine is a softwood, it’s much more susceptible to damage than harder woods like oak or maple. Over-sanding can occur when the sander is left in one place for too long or when excessive pressure is applied.
- How to Avoid It: Always keep the sander moving in steady, even strokes. Never let the sander sit still in one spot, as it can quickly remove more material than intended, leading to dips and grooves. Additionally, avoid pressing down too hard on the sander; let the weight of the machine do the work. This is especially important when using a drum sander, which is more aggressive than an orbital sander. If you’re unsure, it’s better to err on the side of caution and take multiple light passes over the floor rather than trying to remove too much material at once.
2. Using the Wrong Grit Sandpaper
Another common mistake is choosing the wrong grit sandpaper for each stage of the sanding process. Starting with sandpaper that’s too fine can make the job take much longer and may not effectively remove deeper scratches or old finishes. Conversely, using coarse sandpaper for too long can damage the wood and leave it rough.
- How to Avoid It: Always follow the proper grit progression when sanding pine floors. Start with a coarse grit (36-40) to remove the old finish and any deep scratches or imperfections. Then, move to a medium grit (60-80) to smooth out the surface, and finish with a fine grit (100-120) to prepare the floor for sealing. Skipping grits or using overly coarse sandpaper on the final pass can leave the wood too rough while starting with a fine grit can result in spending far too much time trying to remove old finishes.
3. Skipping Between Sanding Steps
Sanding is a gradual process that requires moving through different grits in sequence. Skipping one or more sanding steps can leave marks on the floor, such as scratches from previous sanding stages, that become more visible after staining or sealing. Some people may skip the medium-grit sanding phase in a rush to finish, which is a critical mistake.
- How to Avoid It: Don’t rush through the sanding process. After each sanding phase, inspect the floor carefully before moving on to the next grit. Ensure that you’ve smoothed out any scratches left by the previous grit before advancing. This step-by-step approach will ensure a smooth, even surface that’s ready for finishing.
4. Not Cleaning Between Sanding Passes
Sanding creates a significant amount of dust, especially when working with softwoods like pine. Failing to clean the dust thoroughly between sanding passes and before applying the finish can result in dust particles becoming embedded in the wood grain or the finish, leading to a rough, uneven surface.
- How to Avoid It: After each sanding stage, thoroughly vacuum the floor to remove all dust and debris. Use a vacuum with a soft brush attachment to get into the gaps between the floorboards. After vacuuming, use a tack cloth or damp cloth to wipe down the floor and pick up any fine dust particles. This will ensure that the surface is clean and smooth, allowing the finish to adhere properly and without imperfections.
5. Rushing the Drying Process
When applying finish to your pine floor, patience is key. Rushing the drying process can lead to problems such as bubbling, streaks, or an uneven finish. Oil-based finishes, in particular, take longer to dry, and trying to walk on or apply additional coats before the floor is fully dry can cause damage to the finish.
- How to Avoid It: Always follow the manufacturer’s recommended drying times for the finish you’re using. Oil-based finishes typically require 24 hours to dry between coats, while water-based finishes dry more quickly, usually within 2-4 hours. However, it’s still important to allow plenty of time for each coat to dry fully before applying the next. In high-humidity environments, it may take even longer for finishes to cure, so be patient and avoid walking on the floor until the final coat is completely dry.
6. Neglecting to Sand Between Coats of Finish
After applying the first coat of finish, it’s easy to assume that you can simply apply additional coats without any additional sanding. However, failing to lightly sand between coats can result in a less smooth finish, as dust particles or bubbles can get trapped in the finish.
- How to Avoid It: Once the first finish coat has dried completely, lightly sand the floor with fine-grit sandpaper (220 grit) or a sanding screen. This will smooth out any imperfections, ensuring that the subsequent coat adheres properly and results in a smooth, even finish. After sanding, vacuum and wipe the floor again with a tack cloth to remove all dust before applying the next coat.
7. Not Testing Stains or Finishes
Pine can be unpredictable when it comes to absorbing stains. Applying a stain directly to the floor without testing it on a small area first can result in a color that’s too dark, too light, or uneven. Additionally, some finishes can interact with the wood differently than expected, altering the final appearance of the floor.
- How to Avoid It: Always test stains and finishes on a small, inconspicuous floor area before applying them to the entire surface. This allows you to see how the wood will absorb the stain and how the finish will look once it dries. If you’re not satisfied with the test result, you can adjust the stain or finish type or application method before proceeding with the entire floor. This small step can save you from disappointment and potential re-sanding.
8. Forgetting to Condition the Wood Before Staining
Pine is a softwood that absorbs stains unevenly due to its porous nature. Without pre-treating the wood, stains can soak in too quickly and create blotchy, uneven results, especially with darker stains. Skipping the conditioning step is a common mistake that leads to frustration later on.
- How to Avoid It: Before applying stain, use a wood conditioner specifically designed for softwoods like pine. The conditioner helps the wood absorb the stain more evenly, creating a smooth and consistent color. Apply the conditioner according to the manufacturer’s instructions, usually about 15 minutes before staining. This extra step will make a significant difference in the appearance of your finished floor.
Section 7: Maintenance Tips for Sanded Pine Floors
Once your pine floors have been sanded and finished, proper maintenance is essential to preserve their beauty and ensure their durability. Pine, being a softwood, requires regular care to prevent scratches, dents, and wear. However, with the right cleaning and maintenance routine, you can keep your newly restored pine floors looking pristine for years to come. In this section, we’ll cover some essential maintenance tips, including cleaning techniques, handling minor damage, and when to consider refinishing your floors.

1. Routine Cleaning and Maintenance
Regular cleaning is the foundation of good floor maintenance, especially for softer woods like pine. Pine floors are more prone to scratches and scuff marks, so it’s important to clean them in a way that protects the finish while keeping the surface free of dirt and debris.
- Sweeping or Vacuuming: The most basic form of maintenance is sweeping or vacuuming the floor daily or at least a few times a week, depending on foot traffic. Use a soft-bristle broom or a vacuum cleaner with a hardwood floor attachment to avoid scratching the finish. Dirt and grit can act like sandpaper, scratching the floor as it is walked on, so removing these particles regularly helps protect the finish.
- Mopping: For more thorough cleaning, use a damp (not wet) mop to wipe the floor. Avoid excessive water, as moisture can seep into the wood and cause swelling or warping. Instead, use a microfiber mop or a damp cloth with a cleaner specifically formulated for wood floors. You can also make a DIY solution of water and a few drops of mild dish soap or vinegar, but always test the solution on a small area first to ensure it doesn’t affect the finish.
- Avoid Harsh Cleaners: Do not use abrasive cleaners, steam mops, or products containing ammonia or bleach, as these can damage the finish and dull the surface of the wood. Stick to pH-neutral wood floor cleaners designed to protect and clean the finish without stripping it.
2. Preventing Scratches and Dents
As pine is a softer wood, it’s more susceptible to scratches and dents, especially in high-traffic areas or under heavy furniture. Taking preventive measures can greatly extend the life of your finish and keep your floors looking fresh.
- Use Area Rugs and Runners: Placing area rugs or runners in high-traffic areas like hallways, entryways, and living rooms can significantly reduce wear and tear on your pine floors. Make sure to use rugs with non-slip backing to prevent them from sliding, and avoid rugs with rough textures that could scratch the surface. Additionally, using runners in frequently used areas will help distribute foot traffic evenly.
- Furniture Pads: Place felt or rubber pads under furniture legs to prevent them from scratching or denting the floor. Chairs, tables, and heavy pieces of furniture can leave permanent marks if dragged across the floor. Furniture pads not only protect the floor but also make it easier to move items around without damaging the finish.
- Shoes-Off Policy: Encourage a “shoes-off” policy in your home, especially for guests. Hard-soled shoes, high heels, or shoes with embedded dirt can cause significant scratches or scuff marks on pine floors. Providing a designated spot for shoes near the entrance helps reinforce this policy.
- Trim Pet Nails: Pet nails, especially dogs, can scratch the surface of pine floors. Regularly trimming their nails or using pet booties can help minimize the risk of scratches and keep your floors in better condition.
3. Dealing with Minor Damage
Despite your best efforts, minor damage, such as scratches, scuffs, or dents, may still occur over time. Fortunately, there are ways to address these issues without resorting to a full re-sanding and refinishing of your floors.
- Minor Scratches: Light surface scratches can often be buffed out using a hardwood floor buffer or a microfiber cloth. For scratches that penetrate the finish but not the wood, you can use a touch-up pen or wax stick that matches the color of your floor to fill in the scratch. These products are designed to blend seamlessly with your floor and provide a quick fix for minor imperfections.
- Deeper Scratches or Dents: If the scratch or dent is more severe and has penetrated the wood, you may need to apply a wood filler that matches the color of your floor. Once the filler has dried, lightly sand the area with fine-grit sandpaper and apply a small amount of finish to blend the repaired spot with the rest of the floor. For larger dents, placing a damp cloth over the dent and applying heat with an iron can sometimes raise the wood back up, reducing the depth of the dent.
- Scuff Marks: Scuff marks can often be removed with a damp cloth and a bit of baking soda. Gently rub the affected area until the scuff is gone, then wipe away any residue with a clean, damp cloth. You can also use commercial scuff removers designed for hardwood floors.
4. Recoating vs. Re-Sanding: When to Refinish Your Floor
Even with proper care, all wood floors will eventually show signs of wear. Knowing when to recoat your floor or when a complete re-sanding is necessary can help extend the life of your pine floor without unnecessary work.
- Recoating: If your pine floors start to look dull or show signs of light surface wear but are otherwise in good condition, recoating may be all that’s needed. Recoating involves lightly sanding the surface with fine-grit sandpaper and applying a fresh finish coat. This process restores the floor’s shine and adds a protective layer without removing any of the wood itself. It’s a quicker, less invasive option than a full re-sanding and is recommended every 3-5 years, depending on foot traffic and wear.
- Re-Sanding: If your floor has deep scratches or gouges, or the finish has worn through to the wood in multiple areas, it may be time for a complete re-sanding and refinishing. Re-sanding removes the existing finish and any surface damage, allowing you to start fresh. It’s more labor-intensive than recoating but can restore heavily worn floors to like-new condition. Re-sanding is typically needed every 7-10 years, depending on how well the floors have been maintained.
5. Protecting Your Floor from Environmental Damage
Environmental factors, such as moisture and UV exposure, can also impact the longevity of your pine floors. Here are some tips to protect your floors from these elements:
- Moisture Control: Pine floors are sensitive to moisture, which can cause the wood to swell, warp, or even crack over time. Avoid allowing standing water on the floor, and immediately clean up any spills. In areas prone to moisture, such as kitchens or entryways, consider using rugs or mats to absorb excess water. Additionally, using a humidifier or dehumidifier during the winter and summer months can help regulate indoor humidity levels and prevent wood movement caused by seasonal changes.
- UV Protection: Over time, exposure to sunlight can cause pine floors to fade or discolor. To protect your floors from UV damage, consider using window treatments such as blinds or curtains to block direct sunlight during peak hours. You can also apply a UV-resistant finish to the floor, which will help minimize fading and maintain the wood’s natural color.
6. Establishing a Long-Term Maintenance Schedule
Maintaining your pine floors doesn’t have to be overwhelming if you establish a regular schedule for cleaning and upkeep. Set aside time for routine sweeping, vacuuming, and mopping to keep dirt and debris off the floor. Every few months, assess the condition of the finish and consider whether a light recoating might be needed to keep the floor looking fresh. By staying on top of maintenance, you can avoid more extensive repairs and extend the life of your pine floors.

Conclusion
Sanding and finishing pine floors can transform a worn-out, scratched surface into a beautiful, refreshed space. With proper preparation, the right tools, and careful sanding techniques, you can bring out the natural beauty of pine wood and restore its warm, inviting appearance. Finishing the floor with the appropriate stain and protective coat not only enhances its aesthetic but also ensures durability for years to come.
While the process requires attention to detail and patience, avoiding common mistakes and following best practices will help you achieve a professional-quality result. Routine maintenance, such as regular cleaning and minor repairs, will keep your pine floors in excellent condition and prolong their life. Remember that proper care is key to maintaining the floor’s beauty and functionality over time.
Whether you’re a DIY enthusiast or working on your floors for the first time, taking the time to do it right will pay off. Your newly sanded and finished pine floors will add warmth and charm to your home, making all the effort worth it. Keep this guide handy for reference, and enjoy the rewards of beautifully restored floors.


[…] Sanding Parquet Floors: Expert Advice for DIYers Wood Floor Sanding: The Complete Guide How to Do Pine Floor Sanding: A Comprehensive Guide […]
[…] How to Do Pine Floor Sanding: A Comprehensive Guide Maintain Parquet Floors: 10 Tips for Lasting Beautye […]
Great beat ! I would like to apprentice whilst you amend ylur weeb site,
how can i subscribe for a blog site? The accouht aided me a approppriate deal.
I had been a llittle bitt acquainted of this your
bbroadcast provided brilliant transparent concept http://boyarka-inform.com/
Know Yourr Slot Mechanics
Taake time to learn how paylines, volatility, andd bonus featres work.
High-risk machines mmay not hit regularly,but wheen they do, it’s
substantial. Loow volatility slots give modest payouts more frequently.
Learning this heelps you choose a game that suiuts your style, and you cann
find any of these on Thepokies106. https://NL.Trustpilot.com/review/laurencestassen.eu